
Introduction
Dahlias are the late summer garden’s crown jewel, offering a unique display of architectural form and intense color right up to the first real freeze of autumn. They are members of the Asteraceae family and native to the highlands of Mexico and Central America. These showy perennials grow from underground storage organs, called tubers.
Dahlia tubers are not true bulbs or fibrous roots but storage organs that contain concentrated reserves of carbohydrates and moisture to carry the plant through winter dormancy and fuel a rapid, dramatic flush of growth when warm weather returns. The single most important thing that determines whether your gardening season ends in a field of vibrant blooms or a collection of rotted, unproductive failures is how well you learn to navigate planting dahlia tubers. For information click here.
Planting Dahlia tubers: What Are Dahlia Tubers?
Realizing that dahlias are botanicals makes it easier to understand why normal techniques for planting perennials often fail with these unusual plants. They develop in well-drained volcanic mountain soils with very dry and rainy seasons and therefore require very specific management of soil temperature, soil porosity, and moisture availability.
Home gardeners can view dahlias from a professional perspective and easily unlock their full genetic potential to produce sturdy stalks, lush, dark foliage, and magnificent blossoms ranging from tiny, geometric pompons to massive, dinnerplate-sized blooms.
Dahlia Cultivation
The dahlia genus needs cultural care to help ensure long-term gardening success. These plants thrive in well-drained conditions, experience definite periods of warmth, and grow best in mineral-rich soils. To translate these native conditions into your home garden, you need to follow precise environmental metrics.

Sunlight Needs for Growing Dahlias Successfully
Dahlias prefer full sun, which means they need at least six to eight hours of direct sunlight each day. Photosynthesis requires full sunlight to provide plants with the energy they need. Exposure to sunlight directly affects stem strength, the number of flowers produced, and tuber growth.
Ideal Soil Temperature Before Planting Dahlia Tubers
Why Soil Temperature Matters
One of the most ignored factors in planting dahlia tubers is soil temperature. The ideal temperature is about 60°F (15.5°C), measured about four inches down.
Cool soil slows root development and predisposes plants to fungal disease and tuber rot. When the soil is warmer, it helps plants grow roots earlier and shoots grow faster, so they get established quickly.
When temperatures are too low, tubers may take longer to sprout or sprout poorly.
Optimal Soil pH for Planting Dahlia Tubers
Dahlias like a pH of 6.5 to 7.0 in soil, which is slightly acidic to neutral.
This pH range aids absorption of critical nutrients, particularly phosphorus, resulting in stronger root growth and increased flower production. Balanced soil pH also improves availability of micronutrients needed for healthy foliage and stem development.
Gardens that don’t get enough sunlight will have fewer blooms, weaker stems, and smaller plants. Light afternoon shade may help to reduce heat stress while maintaining strong flowering performance in warmer southern climates.
Testing soil before planting can help avoid nutrient deficiencies later in the season.
Selecting the Appropriate Soil Mix Before Planting Dahlia Tubers
What kind of soil is best?
Dahlias enjoy a loamy, humus-rich, well-draining soil that retains moisture without becoming soggy.
The ideal growing medium has a good balance of organic matter to hold moisture but is porous enough to allow excess water to drain away quickly.
Heavy clay soil tends to hold water around tubers, which can cause them to rot. Sandy soil can dry out too quickly in the summer heat.
Adding compost before planting usually improves drainage and moisture retention.
First Watering Strategy After Planting Dahlia Tubers
Watering After Planting Dahlia Tubers
One of the biggest mistakes that gardeners make is watering immediately after planting.
New planting dahlia tubers usually need little or no water until green shoots appear on the soil surface.
This dry spell prevents fungal infections of dormant tissues, bacterial soft rot, and oxygen deficiency from saturated soil. As soon as visible growth begins, watering can be gradually increased to encourage active growth.
Waiting for shoots between regular watering often makes for better root systems and stronger plants.
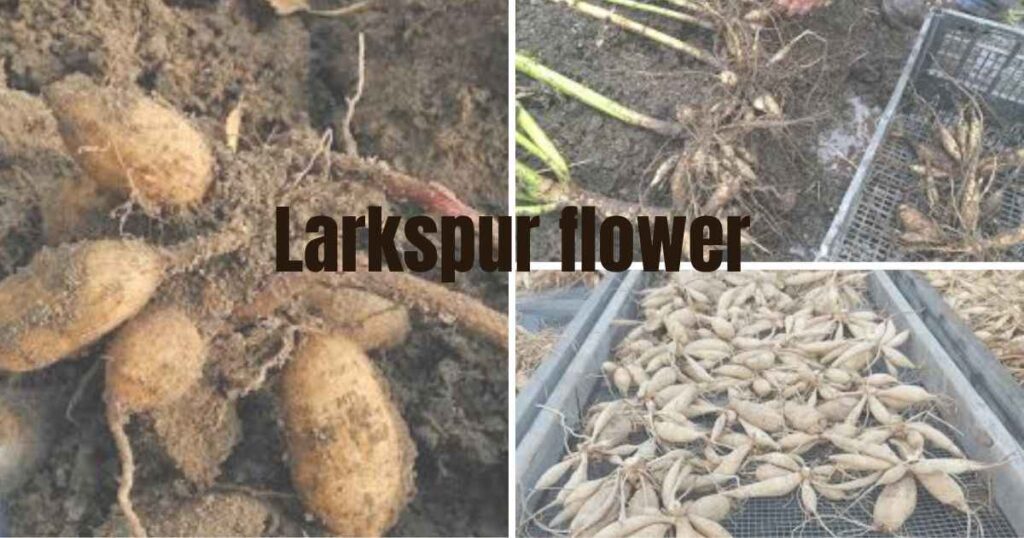
Dahlia Tuber
Knowing the anatomy of the planting dahlia tubers is important for successful propagation and planting. A potato can be cut into pieces, as long as each piece has an eye. A dahlia tuber cannot regenerate from any piece of tissue. For a dahlia tuber to grow into a healthy flowering plant, it requires three specific structural parts. These are the body, neck, and crown.
The tuber’sergy storage organ is the tuber body. It supplies the starches and carbohydrates needed for the plant’s early growth until a stable root system is established. But the body itself contains no genetic instructions, no active buds from which new green growth can spring.
The body is attached to the old stalk by a narrow, fragile region called the neck. The neck is structurally weak, and if it is bent, cracked, or cut off from the crown, the tuber is functionally blind. Even with a big body and lots of energy, a broken neck means those nutrients can’t reach the growing tuber, and the tuber is useless.
The most important part of the dahlia body is the crown. It’s the tissue zone at the base of the previous year’s stem. Only the crown can produce new growth buds, or “eyes” as they are called. An eye looks like a small raised bump or a pinkish-purple swelling, similar to the eye of a potato.
If you are dividing a dahlia clump or buying individual tubers, the piece must contain part of the old crown, with at least one viable eye, an intact neck, and a healthy body. If any one of these three elements is missing or damaged, the tuber will rot in the ground without ever sending up a shoot.
Selecting the Right Location and Soil for Planting Dahlia Tubers
Dahlias are heavy feeders, needing lots of sun and nutrient-rich soil to power their rapid summer growth. The first step to achieving spectacular blooms is to choose the right location in your garden. The site should receive six to eight hours of direct sunlight daily, preferably in the morning and early afternoon. In areas with hot, blistering summer heat, a site that receives light afternoon shade can protect the foliage from heat stress and prevent the flower petals from bleaching.
Soil structure and drainage are just as important. Dahlias will not thrive in heavy, compacted clay soils that retain standing water. As long as soil pore spaces are filled with water, oxygen is pushed out, creating an anaerobic environment that rots the tuber in a matter of days. Test your drainage by digging a twelve-inch-deep hole and filling it with water. If the water drains away in thirty minutes to an hour, you have good soil porosity. If the water sits there for a few hours, you will have to amend the area before you plant.
You can improve heavy clay or too-sandy soils by incorporating a three-inch layer of rich organic matter such as well-rotted compost, composted steer manure, or aged leaf mold. Working this material into the top 10 to 12 inches of soil breaks up tight clay particles, improving drainage while increasing moisture and nutrient retention in sandy soils.
If your garden soil is particularly heavy and hard to improve, then building a raised bed filled with a mixture of topsoil, coarse sand, and organic humus is often the best way to create the ideal free-draining root environment dahlias require.
Understanding soil temperature threshold
One of the most common mistakes that gardeners make is planting dahlia tubers too early in the spring. Being native plants of warm regions, they are unprotected from spring soils that are cold and waterlogged. Planting your tubers in the cold, damp ground puts them into a dormant state, making them very vulnerable to soil-borne fungal pathogens and mold.
The only real test for safe planting is the soil temperature, not calendar dates or surrounding air temperature. Wait to plant until soil thermometers read a steady 60°F (15.5°C) or higher for several days in a row when placed at a four-inch depth. This temperature threshold usually happens about 2-3 weeks after the last average spring frost date for your area, right when you would be planting tomatoes or warm-weather vegetables outside.
To get a jump on the growing season, you can start your planting dahlia tubers indoors in pots about four to six weeks before the last expected frost. Half-fillHalf-fill a large eight-inch container with a lightweight, sterile potting mix that contains plenty of perlite or vermiculite for drainage. Place the tuber horizontally on top of the mix, then cover with 2 inches of soil. Set the pot in a warm spot with bright, indirect light or under a dedicated grow light.
Do not keep the soil too wet, just wet. Starting indoors allows the tuber to safely wake up and develop a healthy root system and strong green shoots in a controlled environment. When the outdoor soil is completely warm and there is no longer any danger of frost, you can carefully move your established container plant right into your garden beds.
Planting Dahlia Tubers: 5 Easy Steps
Once your soil is warm enough, you can get to work and physically plant your plants. Properly positioning each tuber and installing supports at planting time will save your future plants from structural damage and root disturbance.
1. Structural Support Installation First
Before you dig the planting holes,
drive a sturdy six-foot wooden stake or a heavy-duty metal t-post deep into the ground at each spot where you want a dahlia to grow. If you install these supports before you put the tuber in, you won’t accidentally drive right through a hidden tuber later in the season, splitting the crown and killing the plant.
2. Dig the Planting Hole
Depth and Spacing Measurements
Dig a wide, flat-bottomed hole right next to the stake you planted. In normal garden soil, the hole should be six inches deep, but you can drop it to seven inches in loose, sandy substrates or raise it to four or five inches if you are planting in heavy clay. For large varieties, space planting holes 30 to 36 inches apart to allow adequate air circulation and room for the plants to grow.
3. Add Nutrients Before Planting Dahlia Tubers
Enrichment of the root zone
Add a handful of low-nitrogen, high-phosphorus fertilizer to the bottom of the hole to encourage early root health. Look for an NPK formula (such as 0-20-20 or 5-10-10), or add a generous scoop of bone meal. Mix this fertilizer well into the loose soil at the bottom of the hole so that the delicate tuber does not come into direct contact with concentrated granules, which can cause chemical burning.
4. Orient Tuber Horizontally
Direction of crown
Lay the dahlia tuber flat on its side at the bottom of the hole. Ensure that the portion of the crown with the visible growth eye is facing upward toward the sky and position it just an inch or two away from your structural stake. The tuber is supported horizontally so that roots will grow efficiently from the base of the new shoot and to stabilize the developing root system.
5. Backfill and Secure the Substrate
First depth charge cover
Fill the hole with 2 to 3 inches of your amended garden soil, covering the tuber completely, but leave the rest of the hole slightly open. Press down gently with your hands to remove large air pockets around the tuber, but don’t compact the soil. In the next few weeks, the green shoot will continue to grow upward. You will gradually fill in the remaining hole to match the rest of the garden level.
The No-Watering Protocol: A Critical One
Once your planting dahlia tubers are set in the ground, it is essential to adhere to the zero-watering rule. This is the protocol that many home gardeners unknowingly follow, harming their plants. A newly planted, dormant dahlia tuber has no functional root system and no green leaves. It can’t draw up water or take in any, so any moisture that gets into the soil will sit around the dormant tissue.
Dormant dahlia tubers are highly susceptible to anaerobic decay and soil-borne soft rot. In a normal spring, the natural residual moisture in the soil is sufficient to initiate the tuber’s natural awakening and the emergence of the first fine root hairs. Adding more water at this point creates a soggy, oxygen-starved environment that quickly causes the tuber to rot and dissolve into mush.
Do not water the planting dahlia tubers site until you see the first green shoots pushing through the soil surface. This first growth can take anywhere from 2 to 3 weeks, depending on your soil temperature and local climate.
When you see the bright green leaves above ground, it means the tuber has put down its first feeder roots and can start absorbing moisture from the outside. At this point, you can start a regular, deep watering schedule to get the plant through its rapid vegetative growth.
How to Make a Good Watering and Irrigation Schedule
As your dahlias push through the soil and grow several inches high, their water needs will increase dramatically. Dahlias have lots of lush, juicy foliage and giant flowers. They need regular moisture during the summer heat. You want deep, thorough soakings that soak the whole root zone, not light, frequent sprinkles that only wet the top inch of soil.
Established planting dahlia plants usually need one to two inches of water per week, depending on your local temperature and soil type. In hot, dry midsummer weather, you may need to increase your watering to two or three times a week.
To best apply this moisture and make the garden manageable, a dedicated soaker hose or automated drip irrigation system is strongly recommended. These techniques provide water directly to the soil, near the base of the plant, minimizing evaporation and supplying it to the deep feeder roots.
Another great way to prevent disease is to keep water off the dahlia foliage. Overhead watering keeps the canopy humid, allowing fungal spores to land and grow. This often results in common issues such as powdery mildew (appearing as a dusty white film on leaves) or botrytis blight (causing flower buds to rot).
If you must use an overhead sprinkler, do so early in the morning so the rising sun dries the leaves quickly and helps keep your plants healthy and disease-free all season long.
Fertilization and Improved Nutrient Management
Dahlias are heavy feeders, requiring ample nutrients to sustain their rapid growth and continuous bloom from mid-summer until the first frost. But the precise nutrient requirements vary through the season, and an imbalance of nutrients can result in structural problems or fewer flowers.
Nitrogen is important for early plant development and for healthy, lush foliage. Excess nitrogen may cause weak, hollow stems and lush, overgrown foliage, which can detract from flowering.
Nitrogen at high levels harms underground tubers, making them soft and watery and more likely to rot or shrivel in winter storage. That’s why, once the plant is established, you should avoid standard high-nitrogen lawn fertilizers or balanced formulas like 10-10-10.
Look for fertilizers with a lower first number and higher second and third numbers, like 5-10-10 or 0-20-20 NPK formulas. The middle number, phosphorus, is important to strong root architecture and early bud initiation. The last number is potassium. This improves the plant’s internal cellular health, disease resistance, and overall flower quality.
You need to have a definite schedule for your fertilizing:
- Apply the first round of low-nitrogen fertilizer 30 days after planting, when the green shoots are growing well.
- Do this application again 4 weeks later, mid-summer, to encourage the blooming cycle.
- Late summer, use a zero-nitrogen, high-potassium formula to help ripen underground tubers and ensure they store well through the winter. Be sure to apply fertilizers to damp soil. You want to keep the granules a few inches away from the main stalk to avoid chemical burn. After applying, water the area well to help wash nutrients down to the root system.
Essential Maintenance: Pinching and Disbudding
Pinching and disbudding are two important training techniques you can use to get the best performance and biggest flowers from your dahlias. Left to its own devices, a dahlia plant often produces a lone, dominant central stalk. This growth habit results in a tall, top-heavy plant with few early flowers that summer winds can easily blow over.
Pinching back the young plant completely alters its architecture by breaking apical dominance, the chemical signal that causes the main stem to grow up straight. Once your dahlia has reached a height of twelve to eighteen inches tall and has three to four sets of true leaves, grab a clean pair of pruning shears and snip out the central growing tip just above the top set of leaves.
This simple cut encourages the plant to send its energy to the side buds, producing a shorter, sturdier, and much bushier plant with twice as many flowering branches.
Disbudding is the secret trick competitive growers use to get those huge, exhibition-sized blooms, especially on large dinnerplate dahlia varieties. Look at the tip of a developing dahlia stem, and you will note that the blooms are made in threes, one prominent central bud and two smaller ones at the sides.
If all three buds are allowed to grow, the plant will distribute its energy among them and produce three average-sized flowers on short, crowded stems.
But if you let all 3 buds grow, the plant splits its energy between them, and you will get 3 average-sized flowers on short, crowded stems.
When the two smaller side buds are pea-sized, pinch them out carefully, leaving only the large central bud. This is known as disbudding. You should also take off the little leafy shoots that begin to grow in the next two leaf nodes just below that main flower cluster.
By removing those competing growth points, you send all the nutrients and moisture in the branch to the remaining central bud. This simple step will reward you with a dramatically larger, perfectly formed bloom, held high on a long, strong, clean stem that is perfect for cutting.
Autumn Transition and Winter Care of Tubers
As the days grow shorter and cooler in autumn, your dahlia care routine will change dramatically. If you live in USDA zones 8 and above, where the ground rarely freezes in winter, you can leave your dahlia tubers in the ground all year long.
In late autumn, just cut the spent stalks to the ground and cover the whole bed with a thick, six-inch layer of clean straw, bark mulch, or fallen leaves to insulate the soil from cold snaps and heavy winter rains.
However, if you garden in USDA zones 7 or colder, the winter ground freezes deep enough to kill the tender tissues of the tubers. In these northern climates, digging them up and storing your tubers indoors is an important step to ensure they are safe to plant next spring.
The extraction process begins immediately after the first true killing frost of autumn. When a freezing night has come and gone, and the lush green foliage turns black and withers, then you know it has hit.
This frost should be followed by one to two weeks of plants undisturbed in the ground. This short wait period is important; it tells the plant to send down all its remaining sugars and nutrients to the underground tubers so they will ripen and develop the firm skins needed for long-term winter storage.
When this curing period is over, take a clean garden fork or a sharp spade and carefully dig a wide circle around the base of the plant, keeping your implement about twelve inches away from the central stalk so as not to slice through the outer tubers. Carefully lift the whole root clump out of the soil, lifting from underneath so you don’t snap the fragile necks.
Don’t have loosened garden soil; cut back the main stalk to about 2 inches above the crown, and rinse away any remaining dirt with a gentle stream from your hose. This cleaning step is important because it allows you to inspect the clump for damage easily and removes any hidden soil, pests, or fungal spores.
Dry the washed clumps thoroughly in a cool, well-ventilated, frost-free place for 1 to 2 days, until the skin feels dry to the touch. Then line a sturdy cardboard box, a plastic storage crate, or a paper grocery bag with a few sheets of newspaper.
Put the dried chunks of tuber inside and cover thoroughly with a light insulating medium such as dry vermiculite, coarse perlite, damp peat moss, or clean wood shavings.
Store the packed boxes in a cool, dark place with a constant temperature between 40° and 55° F (4 to 12° C), such as an unheated basement, root cellar, or insulated crawl space. The storage area must be kept within this temperature range. If the temperature falls below freezing, the water inside the tubers will expand and break down the cell walls, causing them to rot.
If the space gets warmer than 60°F, the tubers will wake up too early, lose moisture, and shrivel. In winter, check your stored tubers once a month to make sure they are healthy and ready to plant next spring; if they look shriveled, lightly mist the packing material with water, or remove any parts that show the slightest hint of mold.
Conclusion: Planting Dahlia Tubers
Planting Dahlia tubers is a little different than most garden plants. “You need to get rid of the generic gardening routines and apply a specific, technically correct approach. The trick is to understand the tuber’s architectural triad: body, neck, and crown are intact. With this knowledge, one can select and plant specimens with confidence that they are viable and biologically prepared to do well.
By following the 60 degrees Fahrenheit rule for soil temperature and the no-watering protocol, you can protect dormant tubers from early rot and, by maintaining these anatomical fundamentals, create the ideal environment for the tubers to develop strong, healthy root systems.
As the season progresses, deep watering at the base, low-nitrogen fertilizers, and strategic pruning will make your dahlias strong, high-producing plants. When autumn comes and you have done the necessary winterizing, the growing cycle of dahlias is complete. Protecting your investment over the winter months will preserve your favorite varieties and set you up for a more spectacular, expansive garden display next spring.
FAQs: Planting Dahlia Tubers
What happens if I accidentally water my dahlia tubers immediately after planting?
When you plant a new dahlia tuber, it’s vulnerable to rot if you water it before it’s had it’sance to develop roots. A dormant tuber has no root network or active foliage, so it cannot take up soil moisture. The trapped water releases oxygen from surrounding soil spaces, creating an anaerobic zone.
Can I plant dahlia tubers that have grown soft, wrinkled, or broken necks?
A slightly wrinkled but still firm dahlia tuber will grow fine because it can suck moisture from the environment via the newly formed roots and thus rehydrate itself. However, if a tuber is completely soft or hollow, it has rotted or dried out beyond recovery and should be discarded.
Why are my dahlia plants growing exceptionally tall and bushy but failing to produce flower buds?
The problem is usually caused by a nutritional imbalance called nitrogen overload, common when gardeners use regular lawn fertilizers or high-nitrogen plant foods. Nitrogen is necessary for the development of thick green foliage. Still, an excess causes the plant to focus its energy exclusively on leaf and stem growth, delaying or even preventing the formation of flower buds.
How deep should I plant dahlia tubers when cultivating them in large garden containers?
If you are growing dahlias in large pots or containers, plant them about 4 to 6 inches deep, roughly the same depth as in an open garden bed. Begin with a large container holding 5 to 7 gallons of soil, with plenty of drainage holes in the bottom.